前言
在最近,接到了一个SFTP相关的课题,但是之前却并没有使用和了解过SFTP,甚至连FTP都没用过(都2021年了,谁还用那玩意,狗头保命)。所以,在这几天恶补了相关的知识点,并整理一下写了这篇文章(也有一个原因是太久没更新博客了,写一遍文章水一下)
SFTP简介
SFTP的全称是Secure File Transfer Protocol,是一种安全的文件传输协议,是SSH协议(全称Secure Shell)的内含协议。也就是说,我们只要有SSH协议,启动了sshd服务器,那就可以使用SFTP协议了。
SFTP和FTP的区别
上面我们说到了,SFTP是一种安全的文件传输协议,它在传输文件时,会通过非对称加密算法,加密/解密来保证传输文件的安全性。在正是由于加解密的过程,使得SFTP的效率会低于FTP,因此,SFTP通常会用于对传输敏感的文件等安全性要求较高的场景。
SFTP的基本使用
用前准备
0x01 检查使用版本
在上面我们虽然说了SFTP是SSH的内置协议,但是,低于v4.8版本的SSH服务是没有SFTP协议的,因此,我们首先需要使用ssh -V来检测是否能够使用SFTP协议,如果低于最低版本,则可以使用yum update命令来更新ssh服务。

这里我们可以看到,我们的服务是有SFTP服务的。
0x02 创建用户(可掠过)
在这里,我们使用一个全新的SFTP用户来进行操作,当然也可以使用root账户进行操作。这里的命令直接使用Linux的创建用户命令。为了方便管理,我们直接为用户新建一个sftp组。
groupadd sftp
useradd -g sftp -M -s /sbin/nologin sftplx
passwd sftplx
在这里,我们使用groupadd创建了一个sftp的组,我们通过useradd命令来添加了一个sftplx的用户,-g为其指定为sftp组中,-M指定创建用户不创建``HOME目录,-s /sbin/nologin指定用户不能进行系统登录。通过passwd修改sftplx用户的密码。
0x03 修改ssh服务配置文件sshd_config
我们打开/etc/ssh/sshd_config文件,查看Subsystem sftp /usr/libexec/openssh/sftp-server这一行代码是否被注释掉,如果被注释掉,则去掉注释。
0x04 指定用户目录权限(可掠过)
mkdir -p /sftp/lx
usermod -d /sftp/lx sftplx
chgrp sftp /sftp/lx/
chmod 775 /sftp/lx/
在这里,我们使用mkdir指令新建了一个/sftp/lx目录,其中-p表示递归创建,并使用usermod来修改账户目录,其中-d表示我们修改的账户选项为用户目录。我们使用chgtp指令将/sftp/lx/文件夹的所属权赋予sftp用户组,并使用chmod设置/sftp/lx权限为775,即所属用户和所在组可读、修改、执行,其他组用户为可执行。
0x05 重启ssh服务(如果没有修改配置文件可掠过)
systemctl restart sshd.service
0x06 登录验证
我们这里登录方式和ssh类似,直接输入
sftp 用户@ip地址
就可以进行连接,之后输入用户的密码即可登录。
在sshd服务中,使用ssh的端口号为sftp的端口号,默认为22,但如果我们修改了端口号,则需要在用户前加上-P来指定端口号:
sftp -P端口 用户@ip地址
- 这里的格式和ssh的有点不同,端口只能加载用户前面且
-P必须要大写
0x07 可能会遇到的一些小问题
Received message too long 1416128883
当出现这个问题的原因是由于多个进程读取.bashrc文件导致的问题,这个时候我们可以打开sshd_config文件(详细参考第三步),将Subsystem sftp /usr/libexec/openssh/sftp-server修改为无需读取.bashrc文件的Subsystem sftp internal-sftp,然后重启ssh服务
sftp的基本使用
sftp的指令和ssh的文件相关的指令大体相似,我们也可以输入help来显示命令。以下是常用的一些指令:
help: 打开帮助ls: 查看当前目录cd [文件夹]: 进入文件夹pwd: 查看当前路径rm [文件名]: 删除文件rmdir [文件夹名]: 删除文件夹mkdir [文件夹名]: 新建文件夹put [本地文件名] [服务器路径]: 上传本地文件至服务器get [服务器文件] [本地路径]: 从服务器下载文件至本地路径quit、bye、exit: 退出sftp
Java使用SFTP
0x01 引入SFTP工具包依赖
在这里我们使用Maven来进行依赖的管理。直接在Maven中添加依赖:
<dependency>
    <groupId>com.jcraft</groupId>
    <artifactId>jsch</artifactId>
    <version>0.1.55</version>
</dependency>
或者,我们可以在jcraft官网中下载依赖,直接点击链接可以下载0.1.55版本的Jar包。
0x02 创建和关闭连接
package cn.liuxincode.sftp;
import com.jcraft.jsch.*;

/**
 * @author i_liuxin
 * @since 2021-01-04
 */
public class SftpUtil {
    private Session session;
    private ChannelSftp channelSftp;
    private static final String SFT_HOST = "";
    private static final String SFTP_USER_NAME = "";
    private static final String SFTP_PASSWORD = "";
    private static final int SFTP_PORT = 22;
    private static final int TIME_OUT = 5000;

    public void connect(){
        try {
            // 创建登录Session
            session = new JSch().getSession(
                    SFTP_USER_NAME,
                    SFT_HOST,
                    SFTP_PORT
            );
            // 为Session设置登录密码、超时时间
            session.setPassword(SFTP_PASSWORD);
            session.setTimeout(TIME_OUT);
            // 设置Session中服务器自动接收新主机的hostkey(例如第一次SSH登录会出现的提示,设置了no就不会提示)
            session.setConfig("StrictHostKeyChecking", "no");
            // 在Session中链接SFTP
            session.connect();
            // 通过Session创建一个Sftp的连接并尝试连接
            this.channelSftp = (ChannelSftp) session.openChannel("sftp");
            this.channelSftp.connect();
        } catch (JSchException e) {
            this.close();
            System.err.println("创建SFTP链接失败,Exception:" + e.getMessage());
        }
    }

    public void close(){
        channelSftp.quit();
        session.disconnect();
    }
}
在上面,我们通过配置的方式创建了Session,再通过Session创建了一个SFTP连接。在jcraft,我们不仅可以通过Session以session.openChannel("sftp")创建SFTP连接,也可以通过传入的参数创建shell、exec、x11等连接。
0x03 文件传输
在jcraft中,为我们提供了三种不同的传输模式:
OVERWRITE: 覆盖模式,默认的传输模式,即存在相同文件,新上传的文件将覆盖原文件。APPEND: 追加模式,存在相同文件,则在原文件后追加新上传文件。RESUME: 恢复模式,如果由于网络原因导致传输中断,则重新上传文件时将在上次中断位置开始续传。
0x04 文件上传
public void upload(String localFilePath, String servicePath){
    try{
        channelSftp.put(localFilePath, servicePath);
    }catch (SftpException e){
        System.err.println("上传文件失败,Exception:" + e.getMessage());
    }
}
我们直接使用SFTP连接工具类的put方法即可实现文件上传功能,在上面代码中,我们没有设置默认的传输模式,则自动使用OVERWRITE覆盖模式传输。我们也可以通过channelSftp.put(localFilePath, servicePath,1)的方式来指定传输模式,其中,0为默认的OVERWRITE覆盖模式,1为RESUME恢复模式,2为APPEND追加模式。或者可以直接传入ChannelSftp中的成员变量的方式设置传输模式:channelSftp.put(localFilePath, servicePath, ChannelSftp.APPEND)

0x05 文件下载
在jcraft中,如果我们需要进行默认传输模式的文件下载,直接调用channelSftp中的get方法即可。
public void downLoad(String serviceFilePath, String localPath){
    try{
        channelSftp.get(serviceFilePath, localPath);
    }catch (SftpException e){
        System.err.println("下载文件失败,Exception:" + e.getMessage());
    }
}
但是,当我们需要指定传输模式的下载方法时,我们需要通过get(String src, String dst, SftpProgressMonitor monitor, int mode)方法来指定,其中monitor为传输监控器,再传输一些大文件时,通过monitor,我们可以实时监控文件的传输进度。当然,如果我们不需要这个监控器,直接传入null即可。
public void downLoad(String serviceFilePath, String localPath){
    this.downLoad(serviceFilePath, localPath, null);
}

public void downLoad(String serviceFilePath, String localPath, SftpProgressMonitor monitor){
    this.downLoad(serviceFilePath, localPath, monitor, defaultMode);
}

public void downLoad(String serviceFilePath, String localPath, SftpProgressMonitor monitor, int model){
    try{
        channelSftp.get(serviceFilePath, localPath, monitor, model);
    }catch (SftpException e){
        System.err.println("下载文件失败,Exception:" + e.getMessage());
    }
}
0x06 其他常用的文件操作
mkdir(path): 创建path路径的文件夹rmdir(path): 删除path路径的文件夹rm(path): 删除path路径的文件ls(path)、rmdir(path,selector): 显示path路径的文件、按照selector文件条目选择器的条件显示path路径的文件。cd(path): 移动到path目录pwd(): 显示当前路径
0x07 全部代码
package cn.liuxincode.sftp;

import com.jcraft.jsch.*;
import java.util.Vector;

/**
 * @author i_liuxin
 * @since 2021-01-04
 */
public class SftpUtil {
    private Session session;
    private ChannelSftp channelSftp;
    private static final String SFT_HOST = "";
    private static final String SFTP_USER_NAME = "";
    private static final String SFTP_PASSWORD = "";
    private static final int SFTP_PORT = 22;
    private static final int TIME_OUT = 5000;
    private static final int defaultMode = ChannelSftp.OVERWRITE;

    public void connect(){
        try {
            // 创建登录Session
            session = new JSch().getSession(
                    SFTP_USER_NAME,
                    SFT_HOST,
                    SFTP_PORT
            );
            // 为Session设置登录密码、超时时间
            session.setPassword(SFTP_PASSWORD);
            session.setTimeout(TIME_OUT);
            // 设置Session中服务器自动接收新主机的hostkey(例如第一次SSH登录会出现的提示,设置了no就不会提示)
            session.setConfig("StrictHostKeyChecking", "no");
            // 在Session中链接SFTP
            session.connect();
            // 通过Session创建一个Sftp的连接并尝试连接
            this.channelSftp = (ChannelSftp) session.openChannel("sftp");
            this.channelSftp.connect();
        } catch (JSchException e) {
            this.close();
            System.err.println("创建SFTP链接失败,Exception:" + e.getMessage());
        }
    }

    public void close(){
        channelSftp.quit();
        session.disconnect();
    }

    public void mkdir(String path){
        try{
            channelSftp.mkdir(path);
        }catch (SftpException e){
            System.err.println("创建文件夹失败,Exception:" + e.getMessage());
        }
    }

    public void rmdir(String path){
        try {
            channelSftp.rmdir(path);
        }catch (SftpException e){
            System.err.println("删除文件夹失败,Exception:" + e.getMessage());
        }
    }

    public void rm(String path){
        try{
            channelSftp.rm(path);
        }catch (SftpException e){
            System.err.println("删除文件失败,Exception:" + e.getMessage());
        }
    }

    public void upload(String localFilePath, String servicePath){
        this.upload(localFilePath, servicePath, defaultMode);
    }

    public void upload(String localFilePath, String servicePath, int mode){
        try{
            channelSftp.put(localFilePath, servicePath, mode);
        }catch (SftpException e){
            System.err.println("上传文件失败,Exception:" + e.getMessage());
        }
    }

    public void downLoad(String serviceFilePath, String localPath){
        try{
            channelSftp.get(serviceFilePath, localPath);
        }catch (SftpException e){
            System.err.println("下载文件失败,Exception:" + e.getMessage());
        }
    }

    public Vector list(String filePath){
        Vector fileList = null;
        try{
            fileList = channelSftp.ls(filePath);
        }catch (SftpException e){
            System.err.println("获取目录文件列表失败,Exception:" + e.getMessage());
        }
        return fileList;
    }

    public String pwd(){
        String path = null;
        try {
            path = channelSftp.pwd();
        }catch (SftpException e){
            System.err.println("获取当前路径失败,Exception:" + e.getMessage());
        }
        return path;
    }

    public static void main(String[] args) {
        SftpUtil sftpUtil = new SftpUtil();
        sftpUtil.connect();
        // ------------- pwd 和 ls --------------------
        System.out.println("当前路径:" + sftpUtil.pwd());
        System.out.println("\n当前路径文件列表:");
        Vector list = sftpUtil.list("./");
        list.forEach(System.out::println);
        // -------------- mkdir ---------------------
        System.out.println("\n创建testMkDir文件夹……");
        sftpUtil.mkdir("testMkDir");
        list = sftpUtil.list("./");
        list.forEach(System.out::println);
        // -------------- rmdir ---------------------
        System.out.println("\n删除testMkDir文件夹……");
        sftpUtil.rmdir("testMkDir");
        list = sftpUtil.list("./");
        list.forEach(System.out::println);
        // -------------- upload ---------------------
        System.out.println("\n上传json.txt文件……");
        sftpUtil.upload("D:\\json.txt","./");
        list = sftpUtil.list("./");
        list.forEach(System.out::println);
        // -------------- download ---------------------
        System.out.println("\n下载json.txt文件……");
        sftpUtil.downLoad("./json.txt","D:\\test\\");
        list = sftpUtil.list("./");
        list.forEach(System.out::println);
        // -------------- rm ---------------------
        System.out.println("\n删除json.txt文件……");
        sftpUtil.rm("./json.txt");
        list = sftpUtil.list("./");
        list.forEach(System.out::println);

        // ---------------close-------------
        System.out.println("\n关闭SFTP连接……");
        sftpUtil.close();
    }
}
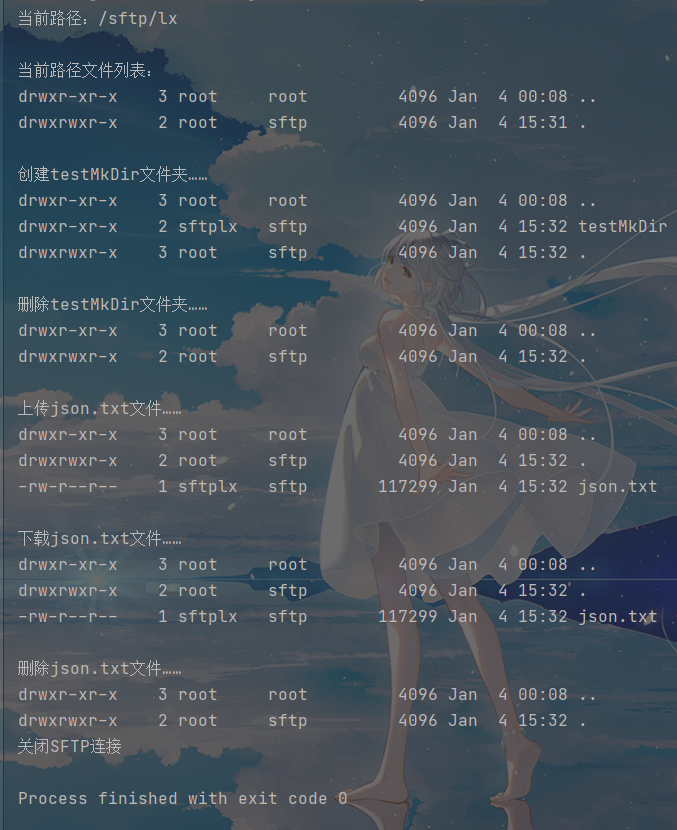
运行结果如下:


